

PROJECT
The project aims to showcase all students’ final major projects in MA Communication Design in a virtual format. There are over 200 pieces of work in total, and my job was designing and managing the exhibition hall(layout), route, exhibits, importing students’ work, and coding with blueprints in UE4.
Duration: 3 weeks
Methods: Kipling’s Checklist, PACT & Competitor Analysis, Brainstorming, Persona, User Case, User Flow, Storyboard, User Testing
Tools: Paper, Pen, Miro, UE4, Blueprints, Adobe Premiere Pro
Problem
Digital exhibition usually lacks the experience that engages the audiences to continue visiting.
Elderly audiences have trouble accessing technologies.
Audiences might have different devices that are not always compatible with the exhibition.
Solution
MACD Virtual Exhibition is a 3D digital space where visitors can walk around, explore the exhibits, and experience the venue.
MACD Virtual Exhibition is displayed in video format so that people don't need to interact directly with it.
MACD virtual Exhibition will be uploaded onto YouTube for everyone around the globe to view on most devices.
TEAM
There are two members of the team: Rylan Li(me) and Allen Yu.
Rylan Li(me): Lead UX Researcher & Designer; Programmer
Allen Yu: Reference Researcher; Layout designer; Video editor
We both participated in designing the exhibition venue, such as brainstorming, ideating and sketching.
Rylan(me) mainly worked on the UX side of the project, such as conducting a survey, product/user analyses and designing the experience. I was also responsible for building a functioning prototype in Unreal Engine 4.
Allen mainly worked on reference research, such as existing products and designs that may be helpful for the project. He also designed the initial layout of the exhibition venue and edited both the teaser and walk-through videos.
CONTEXT
The idea was born when lessons and exhibitions switched to online due to the covid-19 outbreak. Many of our classmates had their semesters entirely abroad, making it hard for them to come back and visit our exhibitions. Therefore, our programme leader and I came up with the idea of creating a virtual show for people to view our work online.
PROCESS
The 5C Model

COLLECT
Kipling’s Checklist
I often start with Kipling's checklist to oversee the project and spot potential problems.

Survey
We surveyed 25 people, including students and lecturers from different courses. We only have 25 people because not all students are confident that they will be able to submit their work a few days before the deadline just for the exhibition.

Interestingly, only 36% of people prefer a virtual exhibition over a physical one. For people who don’t like virtual exhibitions, here are the three main reasons they answered in the survey:

COMPREHEND
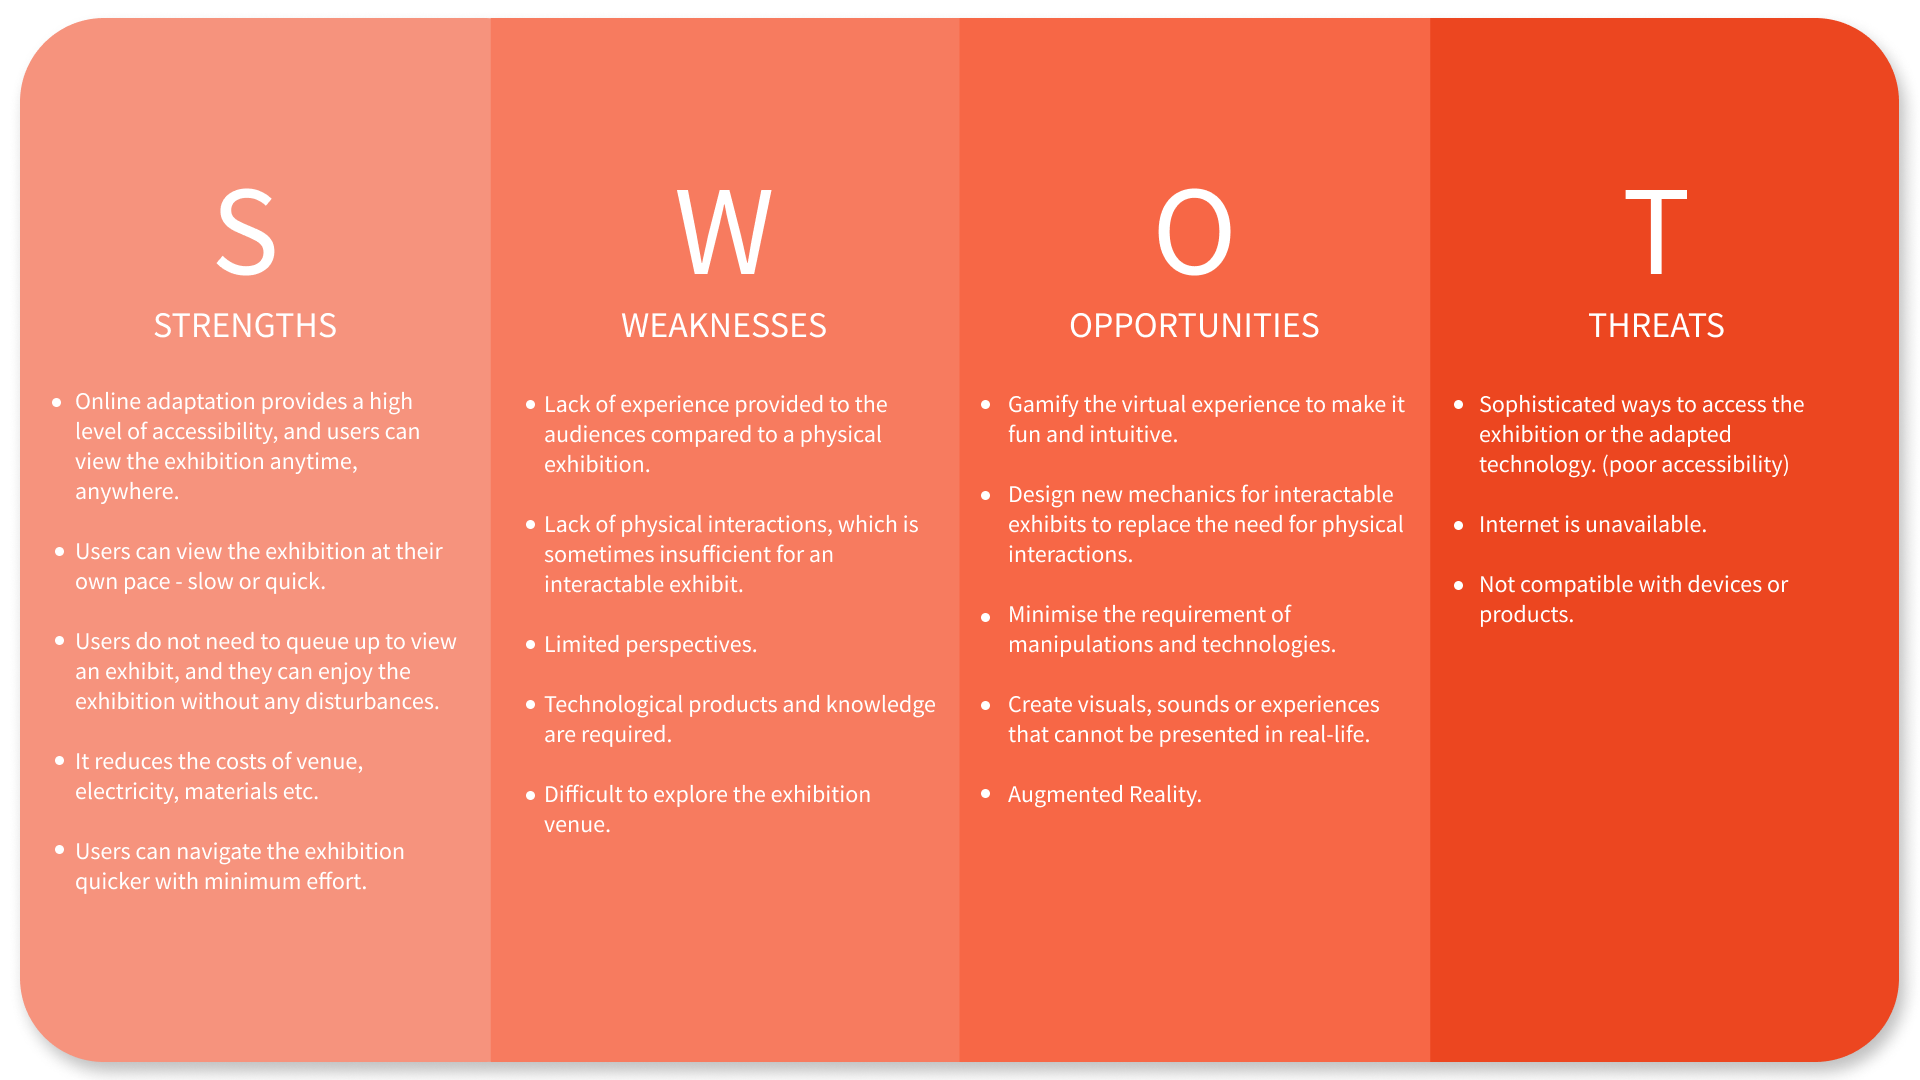
SWOT Analysis
Based on the results above, it is surprising that more people prefer a physical over a virtual exhibition. To understand this finding, I decided to use SWOT analysis to discover the pain points of the virtual exhibition:
Define the problem
After the SWOT analysis, we now understand that although a virtual exhibition provides a higher level of accessibility, users still want to be a part of the exhibition to experience the exhibits in person. Being in an environment will provide a more immersive experience than clicking or tapping on the screen.
Overall, it is all about the feeling when participating in an exhibition instead of focusing on an exhibit. Therefore, I need to think of a way to make people feel 'immersive' during the virtual tour.
Competitor (P-A-C-T) Analysis
PACT Analysis to understand the existing products and how they solved the problems. Allen gave me a list of virtual exhibitions, and I picked the three most significant examples to conduct the analysis: interactive/gamified tour, video tour and 3D virtual walk.


CONCEPTUALIZE
Brainstorming
Now we understand the pros and cons of each type of virtual tour, Allen and I sat down and had a brainstorming session to see which form of the virtual tour we should use.

Overall, every exhibition type has its advantages and disadvantages. In the end, Allen and I decided to use ‘Virtual Walks’ as the main direction because it provides the most immersion.
Persona
It is essential to clarify who we are helping to solve problems before creating anything. Therefore, I made three personas representing three main types of target users: student, lecturer and parent.


Use Case
Once we know who we are solving the problems for, it is time to understand their roles and interactions in the exhibition so that we know what to expect during or after the design process - a use case is an excellent method in this case.

According to the use case diagram, students participate the most since their work is displayed in the exhibition. Lecturers and parents have almost the same participation, but the former usually network during the event. In reflection, we might think of targeting the parents more since they have the least involvement in the exhibition.
Ideate
Ideate is the final step before jumping into product creation. In this section, we looked at the current problems and used insights to solve them.

Moodboard
After the ideation, Allen created a mood board for us to seek inspiration. We’ve divided the exhibition designs into different styles and decided which one we should be taking forward.
CREATE

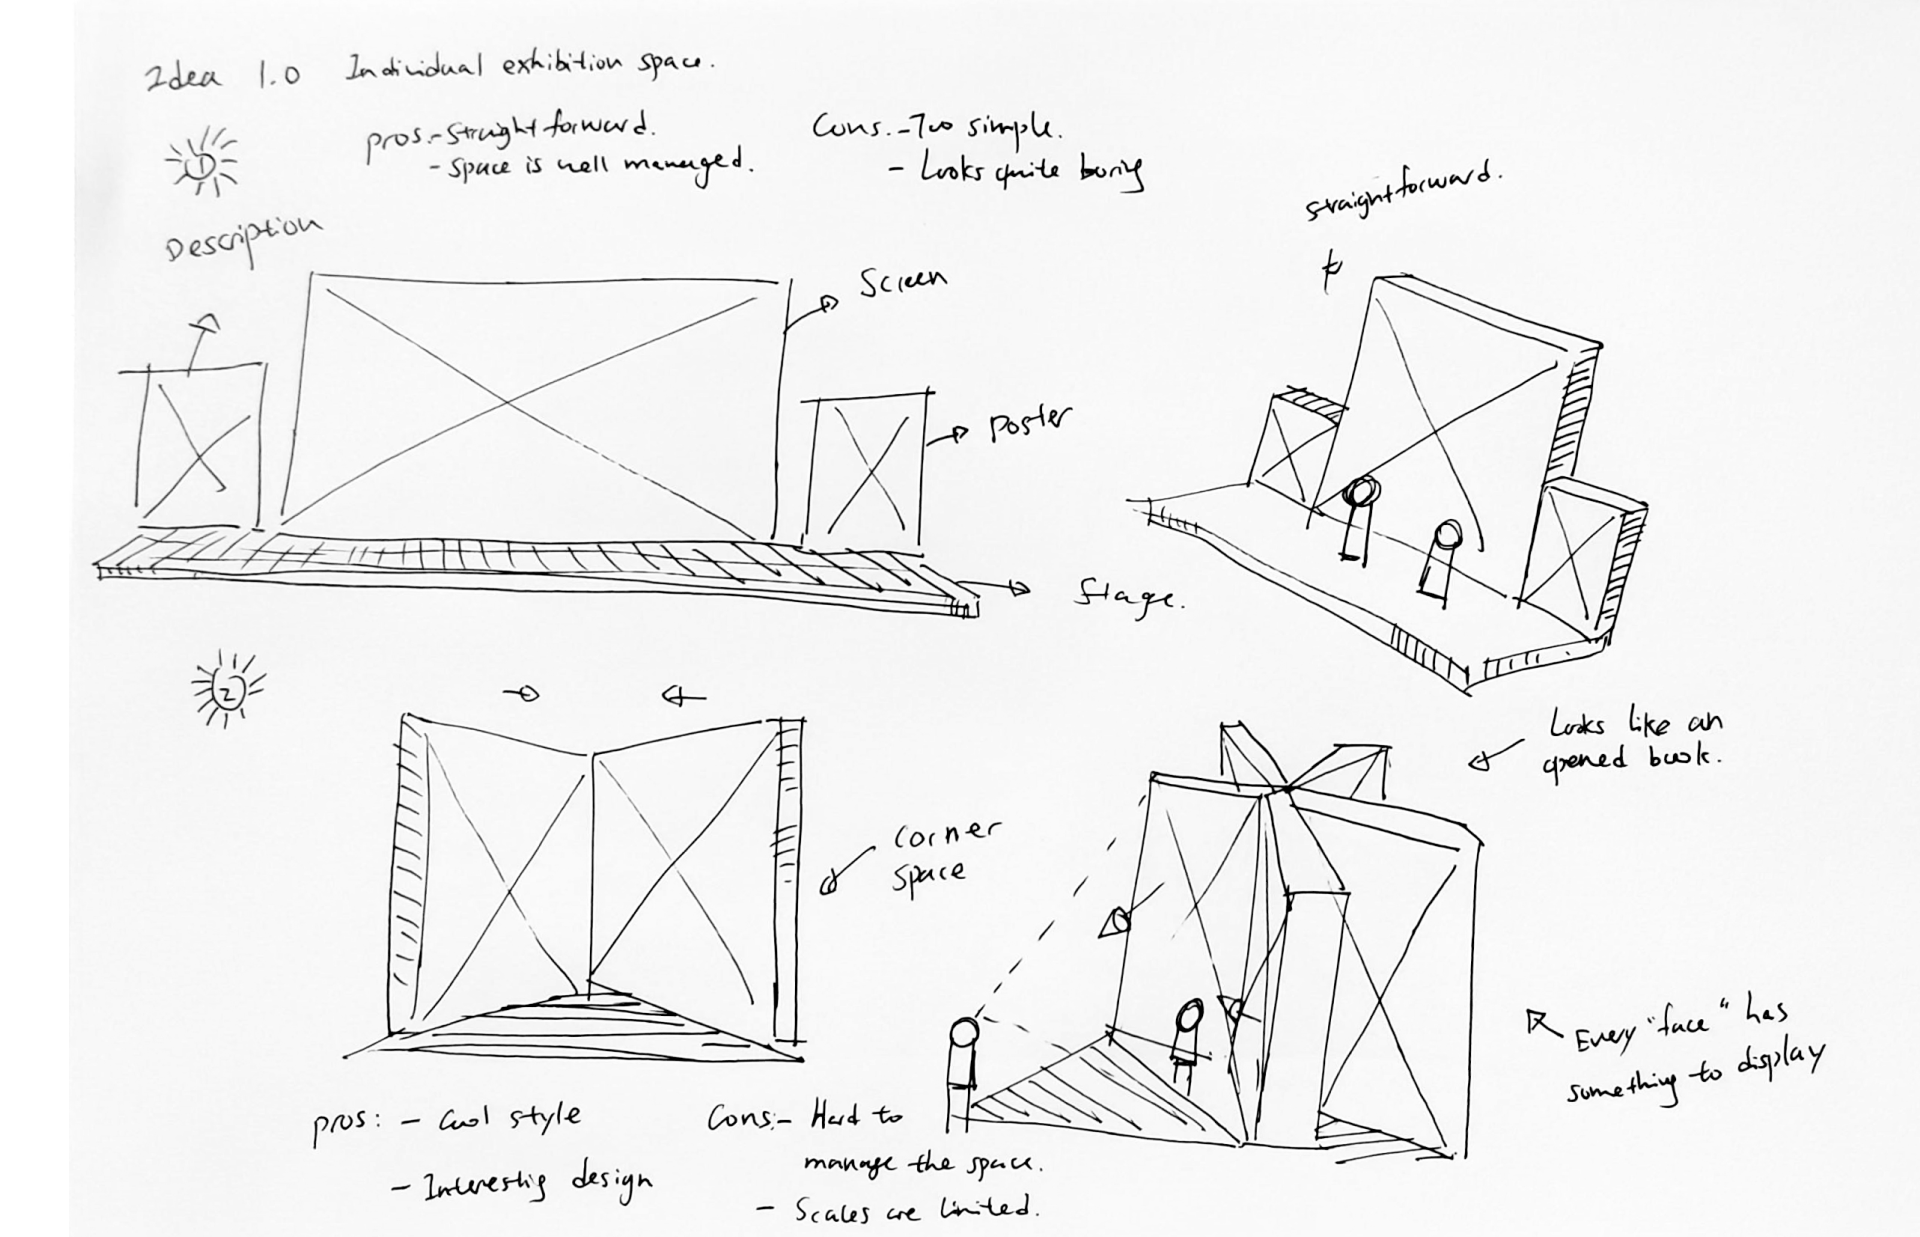
After a few discussions, we decided to provide a unique exhibition space for each person, just like the ‘individual exhibition area’ above. The reason is that everyone has different themes and contents of their FMP, and it would be interesting to see the area matches their style.
User Flow
The idea is to divide the entire exhibition venue into five main halls, and each hall will contain ten exhibition spaces for 50 MACD students. Here is the user flow:

Sketches
Once the user flow has done, we then started to sketch up some ideas:


Storyboard
During the ideations, we both acknowledge that the audience cannot interact with the exhibition because they are watching the walkthrough video on YouTube. To solve this problem, we put a QR code next to each student’s work so the audience could pause the video and scan it to learn more about the exhibit or the artist.

Prototype
Once we came up with some ideas, we moved on to the creation phase. The first thing we did was to make a quick prototype to test out a few things:
The layout of the venue
The volume of each exhibition space
The number of videos/motion graphics UE4 can run simultaneously
Optimisation

1.Interior

2.Exterior
Usability test - beofre & after
I asked a few students to test the prototype, and here are some changes I made during the testing:

Once we had done the layouts, the final part was to make everything function with UE4’s Blueprint(programming), such as walking, running, zooming in & out and even taking pictures.

THE PRODUCT


FUTURE
Future Development
After speaking with my lecturers and a few students, we had some great ideas about this project:
We can create a VR version
For people who have VR headsets
For people who enjoy navigating the space by moving phones around
Use tools to develop a web-based exhibition
For people who enjoy exploring the space by themselves
For people who want to access an interactable exhibition on a website
For our course to have a better way to showcase the exhibition
Project or display the video on a giant screen
For visitors who enjoy seeing works on a larger scales
For University degree shows
In conclusion, the project is well organised with a great development process. It clearly shows the future of visual exhibitions and the potential of storing visual data in a digital space. The product needs to consider more interactive possibilities for future development instead of just playing videos or walking around the venue. I think this project needs gamification to move forward, and we must see it as a video game instead of an exhibition.
REFLECTION
Describe
This project taught me how to work efficiently in a small team and improved my communication skills in many aspects.
Interpret
I had many previous team project experiences and did multiple roles in each project. The unique thing about this one is that we only had two people in the team, and we both had our final major projects besides this one. It took us some time to get used to working with each other, and we completed the project in the end. Throughout this project, I learned how to arrange the tasks at different stages to ensure we are not overwhelmed by the amount of work we need to do. I also learned how to communicate with my teammate and compromise the different opinions we had.
Evaluate
We did not have enough time to polish the exhibition because we needed to gather everyone's final work before the deadline. Therefore, I made the mistake of waiting until the last minute to build the exhibition venue instead of making a foundation earlier. It stressed me out because I had to design the venue whilst implementing students' work.
Plan
UE4 is good at making 3D things with high-quality graphics, but optimisation is also a massive issue in this engine. I only knew this halfway through the project, and it could have been more efficient if I had known there were more suitable tools. My plan for the future is to expand my knowledge of the tool or software so that when I pick up a project, I know which tool to use.